Amazon CloudFrontにアクセス制限付きURLを発行する(その2)
昨日の続きです。
準備は整っているのでtrusted signer付きのCloudFront Distributionを作成します。
AWSのドキュメントではこのあたりのページで手順が紹介されています。
http://docs.amazonwebservices.com/AmazonCloudFront/latest/DeveloperGuide/RestrictingAccessPrivateContent.html#CFPolicyStatementSigners
ここでは今までと同様にAWS SDK for .NETを使用してやってみます。
        public AmazonCloudFront cfClient = Amazon.AWSClientFactory.CreateAmazonCloudFrontClient(accessKeyID, secretAccessKeyID);

        public void CreateCloudFrontDistributionWithTrustedSinger()
        {
            try
            {
                CreateDistributionRequest req = new CreateDistributionRequest();

                CloudFrontOriginAccessIdentity oai = new CloudFrontOriginAccessIdentity();
                oai.Id = "YOUR_OAI_ID";
                oai.S3CanonicalUserId = "YUOR_S3_CANONICAL_USER_ID";

                UrlTrustedSigners trustedSigners = new UrlTrustedSigners();
                trustedSigners.EnableSelf = true;
                // 引数の型はparams string[]なので複数のAccount Numberを渡せます
                trustedSigners.WithAwsAccountNumbers("ACCOUNT_NUMBER");

                CloudFrontDistributionConfig config = new CloudFrontDistributionConfig();

                config.S3Origin = new S3Origin("YOUR_S3_DOMAIN_NAME", oai);
                config.Enabled = true;
                config.TrustedSigners = trustedSigners;

                req.DistributionConfig = config;

                var response = cfClient.CreateDistribution(req);

                String xml = response.XML;
                Console.WriteLine(xml);
            }
            catch (AmazonCloudFrontException cfEx)
            {
                Console.WriteLine("An Error, number {0}, occurred when create cloud distribution with the message '{1}", cfEx.ErrorCode, cfEx.Message);
            }
            catch (Exception ex)
            {
                Console.WriteLine("UnknownError:{0}", ex.Message);
            }
        }
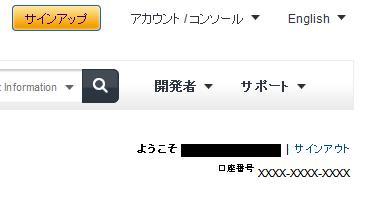
Account Numberはアカウントのページの右上に出ている数字です。プログラム中ではハイフンなしで使います。
https://aws-portal.amazon.com/gp/aws/developer/account
AWS-AccountNumber posted by (C)kanpan
上記のコードの実行結果として以下のようなXMLを取得できます。
<?xml version="1.0"?>
<Distribution xmlns="http://cloudfront.amazonaws.com/doc/2010-11-01/">
	<Id>E30GMJ0MI621X7</Id>
	<Status>InProgress</Status>
	<LastModifiedTime>2011-12-25T10:42:15.113Z</LastModifiedTime>
	<InProgressInvalidationBatches>0</InProgressInvalidationBatches>
	<DomainName>YOUR_CLOUDFRONT_DOMAIN_NAME</DomainName>
	<ActiveTrustedSigner>
		<Signer>
			<Self></Self>
			<KeyPairId>YOUR_KEYPAIR_ID</KeyPairId>
		</Signer>
	</ActiveTrustedSigners>
	<DistributionConfig>
		<S3Origin>
			<DNSName>YOUR_S3_DOMAIN_NAME</DNSName>
			<OriginAccessIdentity>origin-accessidentity/cloudfront/XXXXXXXXX</OriginAccessIdentity>
		</S3Origin>
		<CallerReference>2011/12/25 10:42:12</CallerReference>
		<Enabled>true</Enabled>
		<TrustedSigners>
			<Self></Self>
		</TrustedSigners>
	</DistributionConfig>
</Distribution>
署名付きURLの作成は以下の記事を参考にしました。
Policy Signing in C# for Streaming Private Content From Amazon CloudFront - Bill Beckelman
http://beckelman.net/post/2010/03/30/Policy-Signing-in-C-for-Streaming-Private-Content-From-Amazon-CloudFront.aspx
How to encrypt Amazon CloudFront signature for private content access using canned policy - stackoverflow
http://stackoverflow.com/questions/2284206/how-to-encrypt-amazon-cloudfront-signature-for-private-content-access-using-cann
まずCloudFrontに紐づいている秘密鍵からXML文字列を生成します。
以下のページから「Opensslkey.exe」
http://www.jensign.com/opensslkey/index.html
というツールをダウンロードします。
>opensslkey.exe
RSA public, private or PKCS #8 key file to decode: pk-**************.pem
Trying to decrypt and parse a PEM private key ..
showing components ..Created an RSACryptoServiceProvider instance
URLを生成するコード。
using System;
using System.Collections.Generic;
using System.Text;
using System.Security.Cryptography;

namespace AWSTest
{
    internal class CloudFrontSecurityProvider
    {
        private readonly RSACryptoServiceProvider privateKey;
        private readonly string privateKeyId;
        private readonly SHA1Managed sha1 = new SHA1Managed();

        public CloudFrontSecurityProvider(string privateKeyId, string privateKey)
        {
            this.privateKey = new RSACryptoServiceProvider();
            RSACryptoServiceProvider.UseMachineKeyStore = false;

            this.privateKey.FromXmlString(privateKey);
            this.privateKeyId = privateKeyId;
        }
        private static int GetUnixTime(DateTime time)
        {
            DateTime referenceTime = new DateTime(1970, 1, 1);
            return (int)(time - referenceTime).TotalSeconds;

        }

        public string GetCannedUrl(string url, DateTime expiration)
        {

            string expirationEpoch = GetUnixTime(expiration).ToString();

            string policy =
                @"{""Statement"":[{""Resource"":""<url>"",""Condition"":{""DateLessThan"":{""AWS:EpochTime"":<expiration>}}}]}".
                    Replace("<url>", url).
                    Replace("<expiration>", expirationEpoch);


            string signature = GetUrlSafeString(Sign(policy));

            return url + string.Format("?Expires={0}&Signature={1}&Key-Pair-Id={2}", expirationEpoch, signature, this.privateKeyId);
        }

        private static string GetUrlSafeString(byte[] data)
        {
            return Convert.ToBase64String(data).Replace('+', '-').Replace('=', '_').Replace('/', '~');
        }

        private byte[] Sign(string data)
        {
            byte[] plainbytes = Encoding.UTF8.GetBytes(data);

            byte[] hash = sha1.ComputeHash(plainbytes);

            return this.privateKey.SignHash(hash, "SHA1");
        }
    }
}
上記のコードを呼び出してURLを生成します。
呼び出し時にKeyPair IDと秘密鍵のXML文字列を渡します。
/images/Test.jpg アクセス、制限時間を5分に設定。
        public void CreateCannedPolicyUrl()
        {
            String privateKey =
                 "<RSAKeyValue>.....(略).....</RSAKeyValue>";
            String privateKeyId = "YOUR_KEYPAIR_ID";

            CloudFrontSecurityProvider provider = new CloudFrontSecurityProvider(privateKeyId, privateKey);

            // /images/Test.jpgにアクセス
            // 制限時間5分
            String cannedSignedUrl = provider.GetCannedUrl("http://xxxxxx.cloudfront.net/images/Test.jpg", DateTime.UtcNow.AddMinutes(5));

            Console.WriteLine(cannedSignedUrl);

        }
すると以下のようなURLを取得できます。
画像に5分間だけアクセスできます。
制限時間がすぎると「Access denied」になります。